
How to Keep Your Hearing Aids Clean and Working Well
Hearing aids are small but important tools that help us hear better every day. Because we wear them all the time, they can collect dust, wax, oils, and other dirt. To keep them working properly, it’s important to clean them regularly and protect them from damage. Here’s a simple guide to help you care for your hearing aids.
Why Cleaning Your Hearing Aids Is Important
Hearing aids have small parts that can trap dirt, wax, and other debris. If you don’t clean them, they might not work well and could even get damaged. Regular cleaning will help your hearing aids perform better, so you can hear clearly when you need them the most.
How to Protect Your Hearing Aids
- Use Covers for Extra Protection
If you work in dusty or dirty places, consider using protective covers for your hearing aids, like EARGEAR. These covers help keep dust and moisture away, which can help your hearing aids last longer. - Keep Hair and Skin Products Away
Hair sprays, gels, and lotions can get on your hearing aids and attract dirt. To avoid this, take your hearing aids off before applying any makeup, hair products, or skin creams. Wait until these products dry before putting your hearing aids back on.
Wax and Dry Skin
Ear Wax Is Normal
Ear wax is a natural part of ear health. It keeps your ears moisturized and helps protect against dust and dirt. But when you wear hearing aids, wax can build up around them. While you can’t stop your ears from making wax, you can clean your hearing aids regularly to keep them working well.
Dry Skin and Aging
As we get older, our skin tends to get drier. This includes the skin inside our ears, which can cause more wax buildup. Dry skin and extra wax can cause discomfort and affect your hearing aids. It’s a good idea to talk to your doctor or an ENT specialist if you’re having problems with wax or dry skin around your ears.
Setting Up a Cleaning Routine
Creating a regular cleaning routine will help your hearing aids last longer and work better. Here’s how you can clean them at home, and also take advantage of free or low-cost cleaning services from your hearing aid provider.
Daily Cleaning:
- Use a clean, soft, lint-free cloth to wipe the outside of your hearing aids and remove dirt, dust, and oils.
- Gently clean the charging contacts with the same cloth.
- If you have behind-the-ear hearing aids with domes or custom earmolds, remove any visible wax.
- When you’re not wearing your hearing aids, store them in a safe, dry place to keep them clean.
Weekly Cleaning:
- Use a hearing aid brush to clean the microphone ports and battery compartment.
- Clean the vents (the holes in your hearing aids) with a vent cleaner tool, gently pushing wax from the outside to the inside.
- If your hearing aid has a dome, check for wear and replace it if needed. You can clean the dome with a wax loop or special dome cleaner.
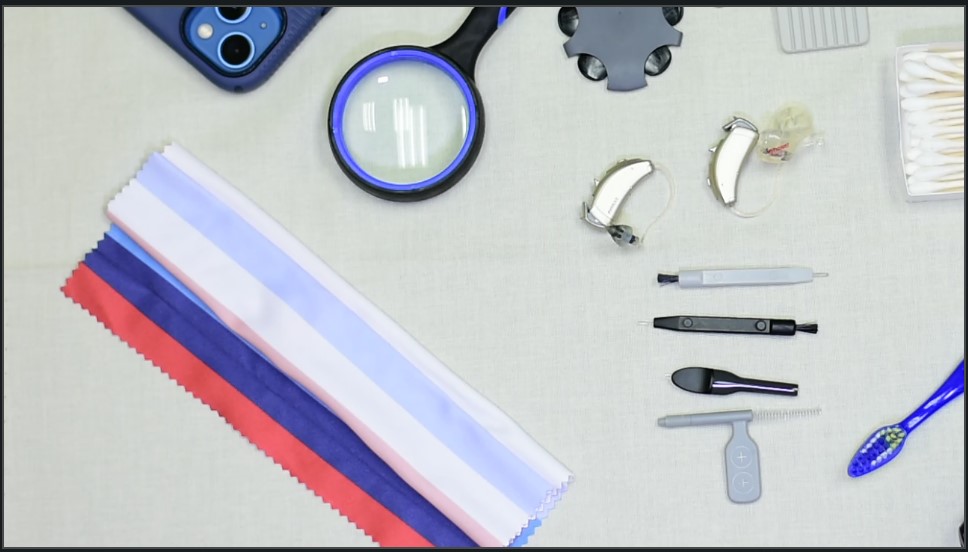
Tools You’ll Need for Cleaning
To clean your hearing aids, you’ll need the right tools:
- Hearing aid brush: This helps clean the microphone ports and battery compartment.
- Wax loop: Use it to remove wax from small areas like the earmold or domes.
- Cleaning cloth: Use a soft, lint-free cloth, and avoid tissues with lotion or aloe.
- Magnifying glass: A magnifier helps you see the tiny parts of your hearing aids clearly for better cleaning.
- Hearing aid specific tools: vent cleaning tool, domes, wax guards or earmold blower
Tip: Use a dark-colored surface, like a dark place mat, when cleaning your light-colored hearing aids. It’s easier to see small parts against the opposite-colored background.
Step-by-Step Cleaning Process
Here’s how to clean your hearing aids, whether they are in-the-ear or behind-the-ear models:
- Wipe the Outside: Start by wiping the outer case of your hearing aid to remove dirt and oils.
- Clean the Battery Contacts: If your hearing aid has a battery door, open it and gently clean the contacts with a small brush.
- Clean the Microphone and Controls: Use a brush to clean the microphone ports and any control buttons.
- Clean the Vents: If your hearing aid has vents, use a vent cleaner tool to remove wax and debris.
- Check the Dome or Wax Guards: Look for wear and tear on the dome and replace it if needed. If your hearing aid has wax guards, check them for blockages and replace them if necessary.
- Clean Earmolds and Tubing: If you use custom earmolds or domes with tubing, make sure they are clear of wax and moisture. Use a brush or air blower to clean them and check for any cracks.
Conclusion: Clean Hearing Aids = Better Sound
Regular cleaning is the best way to keep your hearing aids working well and help them last longer. By following these cleaning steps, you can enjoy clear sound and comfort throughout the day. If you’re not sure how to clean your hearing aids or need supplies, talk to your hearing aid provider for advice and help.
Resources for Hearing Aid Cleaning Supplies:
This article contains affiliate links. This means that, at zero cost to you, Tamco
Learning Creations will earn an affiliate commission if the link is used to or clicked through, and purchase finalized.
By keeping your hearing aids clean and in good condition, you can make sure they continue to support your hearing for many years.
Interested in learning more about new hearing aids, check out our course, First Steps in a New Hearing Aid Journey.
Sign up for our mailing list to be first to know when a new post is ready with more helpful tips and advice to help care for hearing aid.
Have questions about hearing aid care?